DreamLover 2000 Compatibility Notes and Mounting Guide
(will the DreamLover 2000 work with my male's chastity device?)
The DreamLover 2000 receiver has two "terminals" (metallic rings) which deliver the electric pulse.
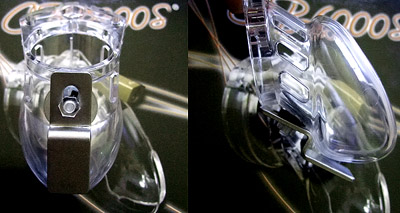
The photograph below shows the DreamLover 2000 mounted on a CB6000 chastity device
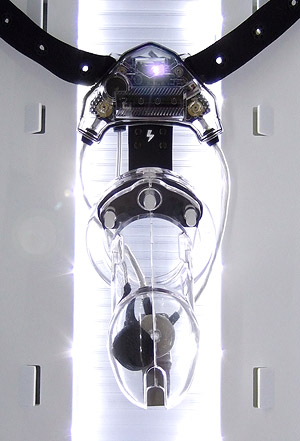
The ring terminals on the pulse cables must make contact with larger electrodes (metallic parts), which come with the product.
For best results and to experience the very well-researched "pulse" stimulus that the DreamLover 2000 offers, one electrode must be in contact with the scrotum, and the other
one must be placed under the glans. Other positions will work too but you will likely have to customize the pulse and introduce a larger AC component for the pulse
to be felt. The results will not be as good.
NEW: metallic chastity device users, uncut users, read this blog post and look out for this
prototype being built.
CB6000 installation
In the pictures below you can see how the DreamLover 2000 was installed onto a CB type chastity device. This will give you an idea of how the mechanism works,
and it should enable you to judge whether it may be possible to install the DreamLover 2000 on other devices.
The CB3000 has a bottom
hole you can use, while the hole must be created on CB6000 devices (simple business, how-to video here).
Please create this hole about 1 - 1.5 cm higher up the cage than shown on these pictures and in the video for best results on CB6000 devices.
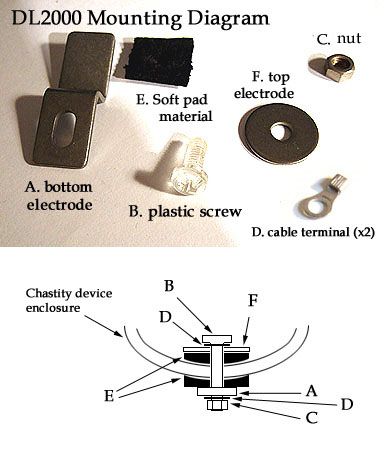
Obviously the two electrodes must not touch during use, so the screw used here is made of plastic.
Parts
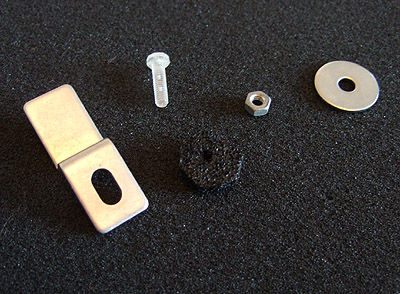
The parts: an L-shaped stainless steel thing, a
plastic screw, a matching hex nut, a simple stainless steel washer and a small piece of foam or rubber ring. The latter is to avoid scratching the chastity device's
body and to prevent the lower electrode from moving around by ensuring good pressure. You can use pretty much anything soft. The L-shaped part has this shape because
it provides good contact with the scrotum.
Update, 2001-03-06: we have decided to include a rubber ring instead of the PU foam with the unit.
The electrodes are more stable when this ring is added instead of the foam.
The electrodes may seem quite big compared with the device. This is not by accident. To allow current delivery to remain stable under a variety of
penis conditions (swelling, pressure against the electrodes, perspiration) we have maximized surface area; this way the current is limited primarily by our circuitry,
and you won't get huge variations in perceived intensity with different penis conditions. Additionally if you're wondering why we don't use TENS electrodes,
the reason is that the adhesive becomes old soon so they cannot be used long-term (additionally adhesive could be mildly irritating). These stainless steel
electrodes allow good contact in a variety of conditions and they are not affected by showers and moisture, so they are far superior to ordinary
TENS electrodes for this application.
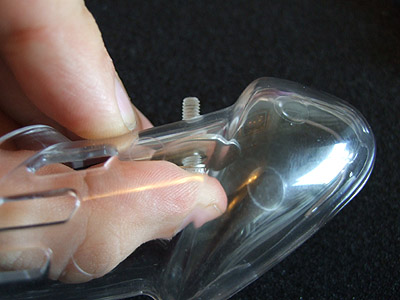
Step 1
One of the ring terminals attached to the DreamLover 2000 pulse cables is facing down, one is facing up. Find the DOWN facing terminal and pass the screw through it,
then add the washer as shown. The ring terminal should face down for proper contact with the washer.
Step 2
You will need to fit this inside the chastity device's cage through the hole (existing hole on the CB3000, self made hole on the CB6000).
Please create this hole about 1 - 1.5 cm higher up the cage than shown on these pictures and in the video for best results on CB6000 devices.
Step 3
Add the foam or a small rubber ring or washer around the screw.
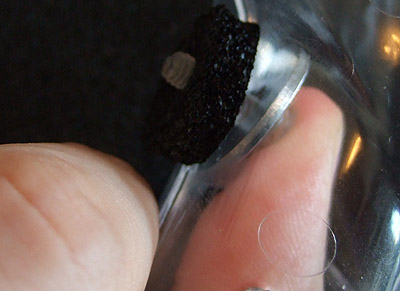
Step 4
On the back side, add the L shaped terminal and push it down enough to compress the foam and create sufficient
space for the UP facing ring terminal, which you will also add.
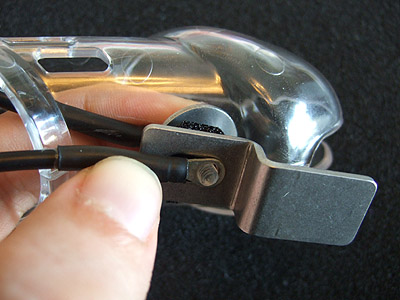
Step 5
Without allowing anything to slide out, add the hex nut to keep everything in place. Push down the L electrode to compress the foam while you turn the nut
to secure the assembly.
During this process the screw will tend to want to escape inside the cage so it's necessary to keep pushing against it with a finger from inside the cage.

| |
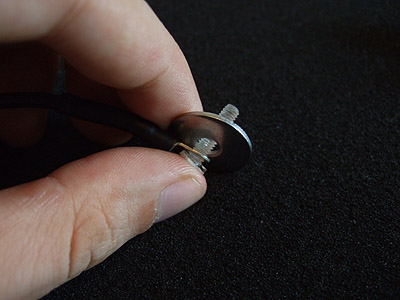
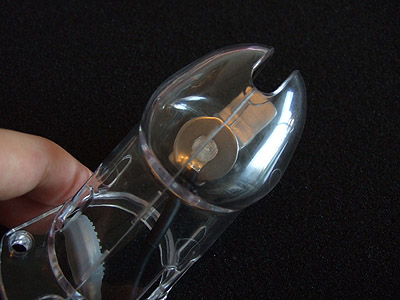
Done
This is what the inner electrode should look like when you're done assembling the electrodes. You can customize this for your male by purchasing
stainless steel parts of different sizes at your hardware store, or choosing a different hole position at the bottom of the cage. Ideally the hole
position is to be chosen so that the underside of the glans (frenum) is always as close as possible to the inner electrode. If you choose to work with your
own parts, make sure the screw head is as thin as possible, this is important to ensure good contact with the inner electrode (a large head will push tissue
away and prevent contact).
Another hole/mounting example using the CB6000S. With the CB6000s it is especially helpful to have some soft material between the bottom of the cage and the
lower electrode to ensure stability. Some of the rubber parts provided with the DreamLover 2000 will do; non-absorbing foam or thicker rubber pieces will be
even better.
Customization for different "belts"
You are more than welcome to replace these standard stainless steel parts. In fact the ring terminal design was chosen precisely because of the need
to install the unit on a wide variety of chastity devices.
In order to install the DreamLover 2000 on any chastity belt, you must satisfy these requirements:
- The ring terminals must make good contact with the stainless steel electrodes
- The electrodes must make reasonably good contact with the skin (scrotum and under the glans). This means ... size matters :)
- There must not be a current path between the electrodes other than the male's penis (steel devices may be problematic or unworkable)
Current must flow from the DreamLover 2000 internal electronics through the ring terminals to the electrodes, and finally
through the penis in order to be felt.
Misc plastic devices
To install the DreamLover 2000 on plastic devices, you must find a way to affix the electrodes to the device's body.
For devices shaped like the CB6000 it's just a matter of finding
a hole underneath the unit or drilling one. For devices that have a very different shape we can't really guarantee that the DreamLover 2000 can be installed. Especially
devices which enclose both scrotum and penis (for instance, the Exobelt series) can be problematic.
These usually have no structure between the scrotum and the penis, so you cannot take advantage of the device's shape. Placement
of electrodes is entirely up to you. If you are really determined to give this a try you could position the electrodes wherever you can affix them and then
play with pulse customization and the AC component (repetitions) until you get something strong enough to go from point A to point B.
This will feel a lot more "electric" than our default setup, and the closer the electrodes the more the pulse will feel like a sting rather than a "slap".
In our view it's an inferior pulse type.
Metallic devices
Installing the DreamLover 2000 on metallic chastity belts and devices is untested.
If you want to give it a try, follow these guidelines.
First, make the hole
For belts shaped like the CB6000 but without a hole, you will need a drill capable of drilling a hole in metal (probably stainless steel);
and you will need additional tools to smooth out the hole's edges.
Electrodes and current path
Electrodes must not touch the body of the metallic cage.
It is mandatory to use some insulating "padding" material between the belt's body and the electrodes. This should not be hard to do, you can use a tiny square
of a hard (plastic/wood) or soft (sponge, or foam Polyurethane) material. If one electrode touches the body of the metallic cage, the electric pulse
sensation could change, and it is possible it would not be felt at all. If both electrodes touch the metallic cage, then nothing would be felt as the circuit
would be shorted through the metallic enclosure.
The main deciding factor in whether metallic devices will
work with our product is whether the current, once it has entered the skin, will travel through tissue to the other end (which is good), or exit and continue its path
through zero resistance metal (which is bad).
Ideally you will succeed by simply insulating the electrodes from the cage. If this works, let us know.
However if that doesn't work you will have to create a path of least resistance through
tissue by insulating at least the bottom of the metallic chastity cage (with tape, for instance) -
possibly the top too.
If neither the electrodes nor the skin around them ever touches the metal
then success is certain.
CB6000
Since the CB6000 does not have a lower hole, you must create a hole in the cage in order to mount our standard cable/electrode assembly.
How-to video here
(please make the hole 1 - 1.5cm higher than shown in the video for best results!)
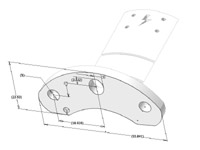
Attachment rubber part
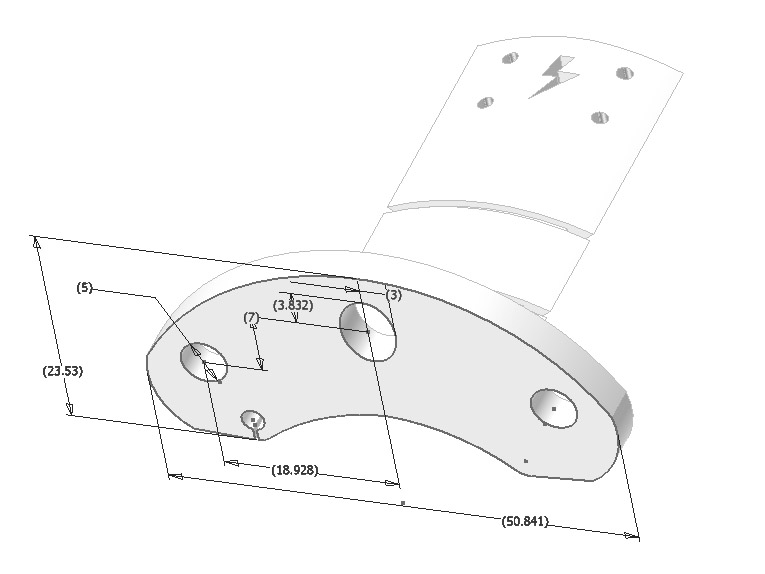
Here you can find the dimensions of our attachment rubber part. Use this information to assess whether the alignment and locking pin
configuration (spacing, thickness) of CB3000/6000 type chastity devices by different makers will be compatible with the DreamLover 2000.
It is possible to add holes to this rubber part, because it is made of silicone rubber. Dimensions are in millimeters.
Click to enlarge:
Note on the electrodes
We've received some inquiries asking us why the electrodes don't look more "high tech" and in line with the product's other parts.
The look of our device is important to us, but not so much that we will accept a performance penalty to have it look pretty. The main
value proposition is proper training of your male and proper pulse delivery. We have experimented with our pulse delivery system at great lengths
and are confident about the electrodes we've chosen.
In this case, we have tested dozens of electrodes, and although better looking ones were easily found, none of them provided the same contact surface
area and stimulus as these seemingly low tech looking stainless steel parts. The bottom electrode's S shape bridges the distance between the chastity cage
and the male's scrotum. If we develop our own electrodes in the future, they might look more curvy and high tech than those you see here, but they will likely
still be made of stainless steel and have a large contact area, so they will not look that different. The bottom electrode will still be S-shaped
to reach the scrotum.
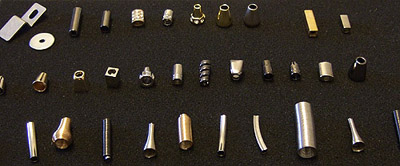
Here are some electrodes that we have tested and that we could source easily, including
gold plated springs and metallic parts that look like jewelry. None of them
yielded the same pulse characteristics as our more expensive standard steel parts shown at the top left.
We believe our choice will become clear when you've had the chance of trying different electrodes.
Using TENS electrodes
"Female spade" terminals can be crimped onto standard electro plug wires.
The spade terminals slip over the ring terminals of the Dreamlover electrodes enabling a secure,
insulated connection without modification to the unit itself.

>> What devices are 100% compatible out of the box?
|