|
2022-07-25 01:20:28 (23834 views) If you still experience any issues, make sure you downloaded the latest DL Uplink.
Before you install a new version shut down DL Uplink completely (as it stays loaded in the task bar, so you can use CTRL-X with the window open).
Also try to open and refresh:
http://dreamloverlabs.com/link/send.php
https://dreamloverlabs.com/link/send.php

2022-07-23 05:40:18 (23912 views) A couple days ago the hosting company was doing something. Then things magically went back to normal. Now we're getting more reports of issues. If you have having issues with commands not going through, please
1. Download the latest DL Uplink installer
2. Clear your browser cache
If you still have issues, email us.
2022-06-26 05:01:47 (24844 views) Due to hosting migration and https compatibility we updated the Windows app (under downloads). If you get some error connecting to the server through the Windows app please download the new version.
2020-12-10 07:11:03 (36104 views) If you find that a new battery you had does not appear to work, most likely it is due to storage time. Unfortunately we made the battery life on the DL2000 last too long and so other batteries you may have are 'old' by the time you need them! :D
In these cases the battery simply needs to be depassivated (have a current load so it 'wakes up').
Case 1: Pulses work, arousal inducer resets the device (green flashes)
Solution: Set a pulse timer with 1 tick interval, 70 repetitions, pulse level high. Let the receiver do its thing. That should restore function.
Case 2: Pulses reset the device.
Solution: Plug the battery into the remote control (Same voltage and connector), then send 100 commands from the remote control (no need for a receiver to be present). Then try it again in the receiver.
If these do not work your battery is actually depleted. These tips only work if the battery is new but has been sitting for a long time. They cannot restore a used battery.
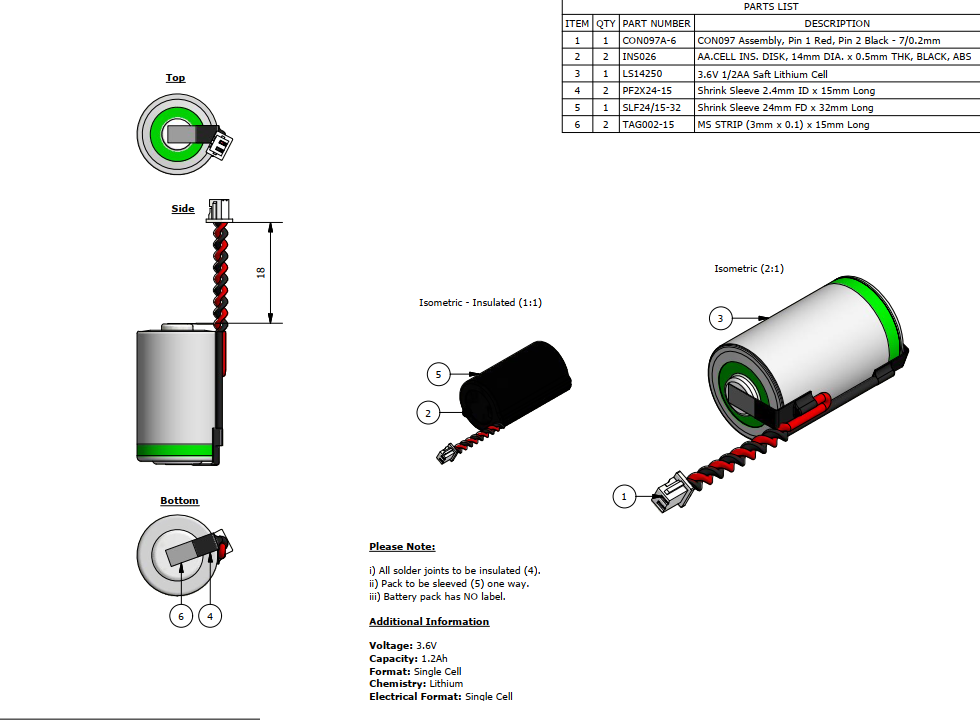
If you want to buy new batteries locally the cell type is LS14250. It is a spiral type LiSoCl2 cell, please stay away from non-lisocl2 batteries of the same shape as they may malfunction (not enough discharge current). The connector is a molex 51021 (2 pins).
The battery construction diagram is below:
2019-09-02 15:47:50 (41756 views) Our relationship with card processors has never been good, but it has deteriorated throughout the years. As you can see we no longer have card processing. They kept saying we were a 'risk' when we didn't have any card dispute for years. Eventually they kept changing the rules and dropping us with no recourse. Fought like mad to find replacements, but to no avail. No one, anywhere in the world, will process credit cards for us.
One of the rules they put forth is that we cannot have any nudity, even partial, on our website. So we've literally been banned since the beginning from showing our product when worn!
Well they've decided to drop us anyway even though we followed all the stupid rules so at this point they can go eat a dick and here's some footage.
http://nastybulb.com/video/751d969d3c.html?cat=femdom&e=1
2019-01-20 18:30:25 (38524 views) Please note the forums/blog are very sporadically moderated. If you are a prospective customer with product related questions, email us for a fast response.
|


